> For the complete documentation index, see [llms.txt](https://help.prequilt.com/llms.txt). Markdown versions of documentation pages are available by appending `.md` to page URLs; this page is available as [Markdown](https://help.prequilt.com/prequilt-101/starter-quilts/orphan-block-quilts/04-random-play.md).

# 04 Random Play

<mark style="color:blue;">**✓**</mark> Photographs of orphan blocks

<mark style="color:blue;">**✓**</mark> Imported and trimmed into PreQuilt

<mark style="color:blue;">**✓**</mark> Made digital blocks out of photographs

<mark style="color:blue;">**✓**</mark> Now we're ready for the fun part!

## <mark style="color:blue;">01 Randomly Rotate Orphan Blocks</mark>

Now that all your blocks have been added to the quilt. We can play with the rotation of the block. You can randomly rotate all the blocks at once and/or manually rotate one at a time. Here are the directions for randomly rotating all blocks at once.

1. To select all blocks in the quilt, click on the <mark style="color:blue;">**infinity symbol**</mark> (<img src="/files/isU6bZyoJOaS6FMSDOiG" alt="" data-size="line">) in the top left corner of the quilt.
   * ![](/files/V2o3yLUOkfPDlBJABSRd)
2. Click on the '<mark style="color:blue;">**RANDOMIZE**</mark>' tab on the Left Side Control Panel.

   <div align="left"><figure><img src="/files/lbeS1KEZqmMbRVY2utJj" alt=""><figcaption></figcaption></figure></div>
3. Click on the '<mark style="color:blue;">**Rotate**</mark>' button. Blocks will randomly rotate into a new position.

   <div align="left"><figure><img src="/files/QIzIngUN0KqesqOhDJDn" alt=""><figcaption></figcaption></figure></div>
4. Repeat ***Step 01.3*** as many times as you'd like until you find something you like. The quilt on the left is before random rotation and the quilt on the right is after random rotation. I like the V's and flying geese.

   <div><figure><img src="/files/H3VIHflK7KVvqv3zzQEI" alt=""><figcaption><p><em>Before random rotation</em></p></figcaption></figure> <figure><img src="/files/z6OxYRx0HOjlQnPPFW7B" alt=""><figcaption><p><em>After random rotation</em></p></figcaption></figure></div>
5. Like everything, but one block? Individual blocks can also be rotated.&#x20;
   1. <mark style="color:blue;">**Select**</mark> the block you'd like to rotate by <mark style="color:blue;">**clicking on it**</mark>.
      * ![](/files/1wvhbx21m3OSJ4QSSVUb)
   2. Click on the '<mark style="color:blue;">**Rotate**</mark>' button on the central [*<mark style="color:blue;">Toolbar</mark>*](/welcome-to-prequilt/about-this-help-guide/glossary.md#toolbar).
      * ![](/files/EthFYL025gNcXpTdbjou)
   3. Only that block will rotate. Click as many times as you'd like it to be rotated.
      * ![](/files/DNq5nm4dnqcB3JXqyXu2)

## <mark style="color:blue;">02 Randomly Add Orphan Blocks into Quilt</mark>

Another way to play with your orphan blocks is to randomize the location of your blocks on your [*<mark style="color:blue;">quilt grid</mark>*](/welcome-to-prequilt/about-this-help-guide/glossary.md#quilt-grid). If you're working with only one of each block, there's also a way to ensure it only appears once in your quilt.

1. Click on the '<mark style="color:blue;">**RANDOMIZE**</mark>' tab on the left side control panel.

   <div align="left"><figure><img src="/files/byLm4KNHdnEdsTYlZBQ2" alt=""><figcaption></figcaption></figure></div>
2. Click on the '<mark style="color:blue;">**Blocks**</mark>' button.

   <div align="left"><figure><img src="/files/qo69eFrieT6U050ZVbND" alt=""><figcaption></figcaption></figure></div>
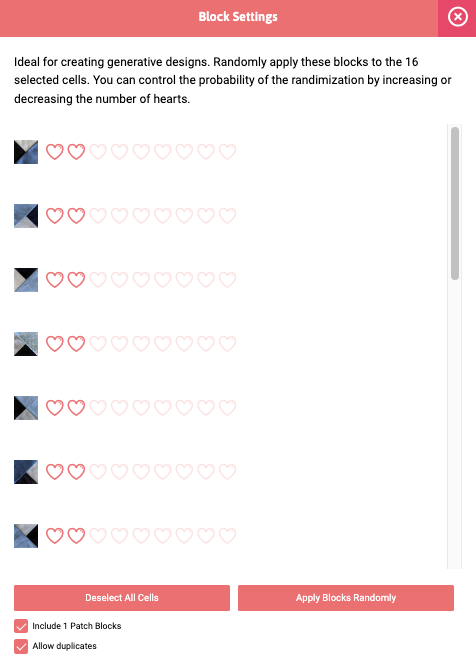
3. A pop-up window called '**Block Settings**' will appear on the left side. It will have an image of each of your blocks as well as some hearts next to each block.

   <div align="left"><figure><img src="/files/YedQiB699KkzElJnw1xT" alt=""><figcaption></figcaption></figure></div>
4. Scroll to the bottom of the list of blocks and uncheck the '<mark style="color:blue;">**Include 1 Patch Blocks**</mark>' option. This will disable solid squares of each color tag from being added to the quilt grid.

   <div align="left"><figure><img src="/files/7MjvocDG3mf7KEZWAZWv" alt=""><figcaption></figcaption></figure></div>
5. If you only have one copy of each orphan block, then uncheck the '<mark style="color:blue;">**Allow duplicates**</mark>' option.

   <div align="left"><figure><img src="/files/nKKeqCpRs8u46aWpKMZ5" alt=""><figcaption></figcaption></figure></div>
6. Click the '<mark style="color:blue;">**Apply Blocks Randomly**</mark>' button.

   <div align="left"><figure><img src="/files/4lt4OFIjpXYuPPjFWNNi" alt=""><figcaption></figcaption></figure></div>
7. Once you find a layout you enjoy, click on the <img src="/files/FkvpHEwtFfS7QR7O7Wg0" alt="" data-size="line"> button in the top right corner of the '**Block** **Settings**' tab.

   <div align="left"><figure><img src="/files/CvsvrT5c2yn01Q0FCWOs" alt=""><figcaption></figcaption></figure></div>

## <mark style="color:blue;">03 Finishing It Off</mark>

If you'd like, feel free to finish off your quilt with adding borders or binding!